How to multiply your plant using cuttings !
- AllotMe

- Feb 28, 2022
- 4 min read

Would you like to add more plants to your indoor or outdoor collection? Silly question.. of course you would - and we’re going to teach you how, without sowing or buying any new ones.
It may seem miraculous, but many vegetable, herb and household plants will allow you to create multiple plant babies simply by ‘rooting’ selected cuttings from the original plant.
What is a Cutting?
Exactly what it says on the tin: a cutting is a segment of a plant that you have cut from a stem using a sharp knife, secateurs, or a pair of scissors.
Which plants can I take cuttings from?
Using cuttings to create new plants can be performed on a wide variety of plant species. Most herb shrubs will allow you to take cuttings such as Rosemary or Sage. Generally the plant species that you can take cuttings from are split into two categories: Softwood and Hardwood. The names are a dead giveaway for which are which - just look at the stems of the plant. If they resemble a solid ‘twig-ish’ texture, they they will likely be Hardwood.

Hardwood stems can have cuttings taken during autumn and winter months, generally when the plants are dormant. Softwood plants can have cuttings taken during Spring and Summer months, generally when the plant is thriving, and new growths are sprouting. We’ve compiled a short list of some of our favourite plants that you can take cuttings from below, though are many more…
Herbs:
Basil
Mint
Rosemary
Sage
Lavender
Fruit / Vegetables Plants:
Peppers
Tomatoes
Sweet Potatoes
Celery

House Plants:
Ficus Elastica / Rubber Plant
Mother-in-law’s Tongue / Snake Plant
Mostera / Swiss Cheese Plant
Jade / Money Plant
Aloe Vera Plant
Flowers / Ornamentals:
Roses
Lilacs
Azaleas
Hydrangea
Wisteria
How to take a Cutting
First of all, we want to make sure the cutting will have the best chance of success, so choose a plant that is in a good state of health. This means there should be no sign of disease, drooping or foliage in decay. Secondly, the plant itself should be large enough that taking a cutting will not cause it any harm.
Although different plant species will require slightly different methods for taking cuttings, there are general rules of thumb that will apply to most. The newer the growth, the easier the cutting will form roots. Additionally, finding side stems that have nodes (a bump at the base of the stem) will also encourage roots to emerge.
Using a sharp knife, scissors, or secateurs: make a clean cut below the node, or so that it is of sufficient length (approximately 4 - 6 inches). Some plant species will allow you to simply snap a side stem off at the point where it meets the primary stem, so long as the break is clean enough.
Once the cutting is taken, you can also ‘scarify’ the stem. This means taking a razor blade or scalpel and cutting a further clean slice through the middle of the node (bump at the base of the stem).
Remove any leafs or foliage close to the base of the stem, whilst leaving a few of the newer branches of foliage towards the top. The cutting is now ready to begin ‘rooting’.
Rooting your Cutting
There are 2 different methods of ‘rooting’ your new cutting, which is simply the process of encouraging new roots to emerge. Both methods are relatively simple and will have their own advantages depending on the plant species.
Option 1 (requires “Rooting Hormone/Powder” and Potting Mix)
Prepare a small pot of cell tray with potting mix and create small holes a few inches deep with your finger or a dibber. Take the base of the cutting and dip it in water. Once wet, dip the bottom couple of inches into your rooting powder and tap off any excess.
Gently place the stem into your pot or cell in the holes already formed, and fill with additional potting mix as required - until the cutting stands upright by itself.
Cover the newly planted cutting and pot with a clear plastic bag whilst the roots are forming. Do not seal the bag completely, so there is still some airflow to the plant. Keep it in a well lit area, but away from direct sunlight.
Keep the potting mix damp, but not so wet that condensation forms on the bag - this will help to avoid rot forming. Remove any unsuccessful cuttings at first sign of trouble. Gently tug on the plant after 2 - 3 weeks to check for resistance: This will be a sign that roots have began to form. Once this has happened, you may transplant the cuttings into their own larger pots!

Option 2
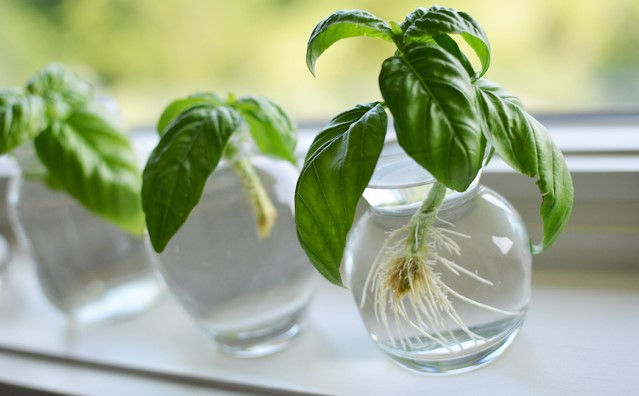
Plants with softer stems can be rooted in water. This works with plants such as tomatoes, or most succulents for example. The process is even simpler than the first option.
Simply place the cutting in a container of water slightly deeper than the height of the cutting’s stem. The foliage at the top of the cutting should be used to brace the plant to avoid completely submerging in the water (miniature vases with open tops and narrow necks are great for this purpose).
Use a clear container so that you can track progress and see when the roots have emerged. Be sure to change the water every few days and make sure it does not get cloudy. Once a few roots have emerged, the cutting can be transplanted into a pot or container to continue its growth. Give the cutting a healthy watering when you have done this.

And there you have it! Everything you need to know to make plenty of ‘plant babies’ from one health plant. Not sure if your plant will allow you to make new ones from cuttings? Give it a try! (So long as the plant is large enough to not be damaged by taking the cutting).
Let us know how you get on by posting your progress to instagram and tagging @AllotMe_UK.
Happy cutting !


Comments